Wednesday, October 31, 2012

Updated BitNami Spree Stack Released

We have just released an updated version of the BitNami Spree stack, which now bundles Spree 1.2.0. Spree is a powerful and flexible e-commerce platform for Ruby on Rails framework. As with all BitNami Stacks, it can be deployed using all-in-one free native installers, virtual machines and Amazon Cloud Images. The BitNami Spree stack includes ready-to-run versions of Apache, MySQL and Ruby On Rails.

This latest release includes Spree 1.2.0, which  features custom look, product and order management, hundreds of extensions and awesome themes. With Spree, you can create an attractive and useful interface for your customers to purchase goods and services through your website.


Spree products page

On the back-end, it provides a powerful interface for managing orders, products and configurations easily.

Spree administration dashboard


Tuesday, October 30, 2012

BitNami JRuby Stack 1.7.0 released! Run Your JRuby App in the Cloud

A week ago, JRuby 1.7.0 was released. We have been anxiously awaiting this release and have updated the BitNami JRuby Stack to include this new version. We have also updated other major components of the Stack, including Tomcat 7 and Java 7, rails 3, bundler and other useful gems. As with all BitNami Stacks, you can get the latest JRuby Stack for free as a native installer, virtual appliance or AMI for the Amazon cloud.

The BitNami JRuby Stack now defaults to 1.9 mode, but it is both Ruby 1.8 & Ruby 1.9 compatible and both versions of Ruby are bundled in a single install. JRuby 1.7 is the first release to support the new “invokedynamic” feature of the JVM. For more details, see the JRuby Release notes.

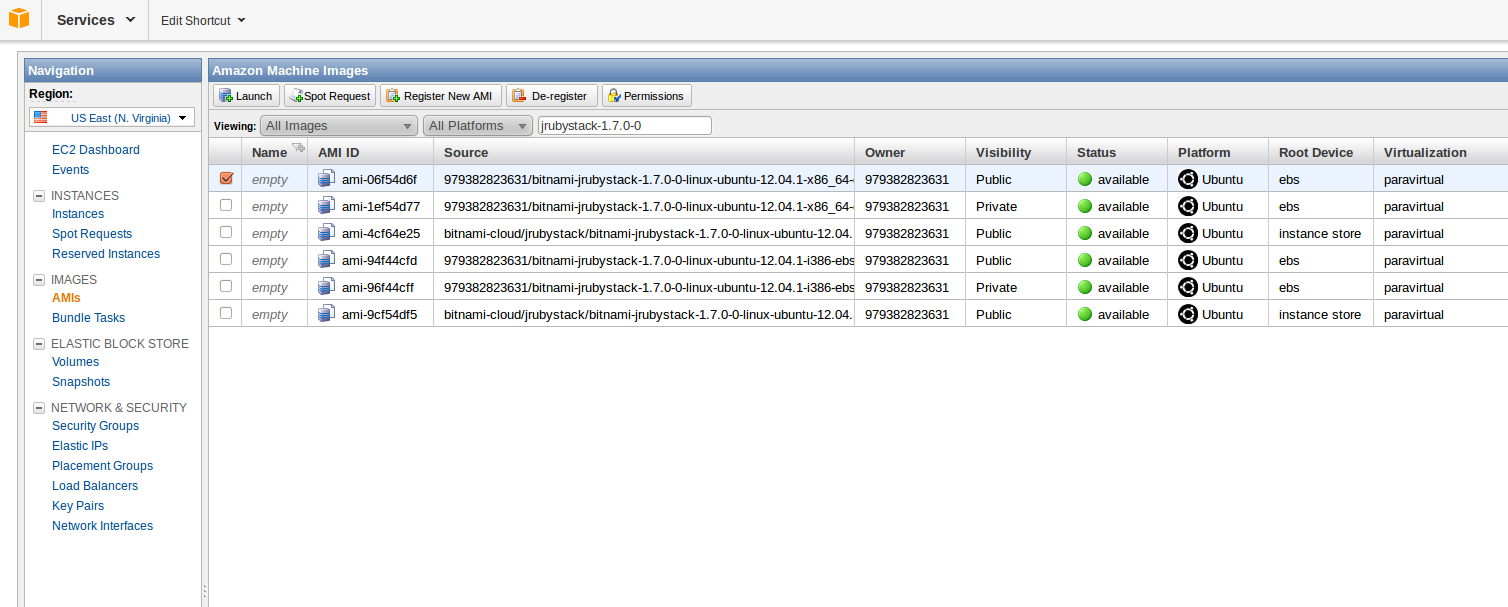
Let's take a quick look at the latest JRuby release. For that, we will launch a BitNami JRuby Stack AMI. Later, we can use this same AMI to host our application in production in the cloud. To follow along, you will need an Amazon account to access the Amazon Web Services (AWS) Console. Instructions on how to create your account can be found here (note that Amazon offers a free tier which provides you with a free micro instance for a year). Once you login to the AWS Console, go to the EC2 tab and launch a new Instance. You can locate the BitNami JRuby Stack image by searching in the Community AMIs tab for "jrubystack-1.7.0-0", which is the latest version at the time of this writing.


Another option is to launch your AMI directly from the BitNami website. Select your preferred region (United States, Europe or Asia) from the drop down menu and the architecture (32 or 64 bits) and click on the appropriate link as shown in the image below.


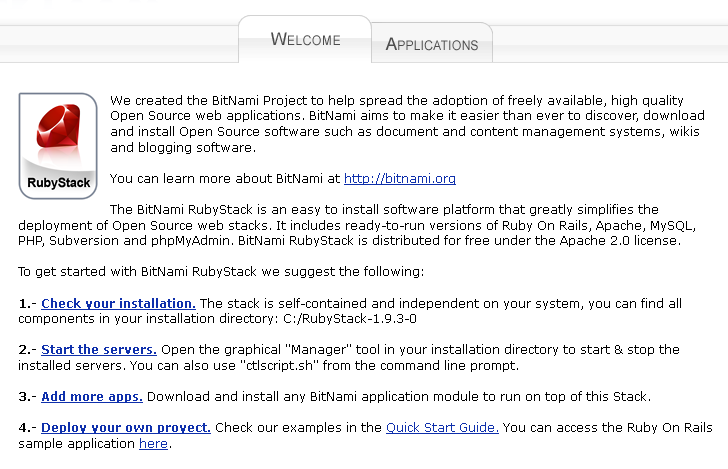
Then, you can set different parameters from the AWS Console, such as: availability zone, ssh key, the image type (micro, small, medium, etc) and the security group. Once the machine is started, access it by typing the public DNS name in a browser. You should see something similar to the screenshot below.


The next step involves connecting to the machine. You can download the private SSH key from your Amazon account. If you want to connect to the machine from Windows using the popular tool Putty, you will need to convert your private key to the .PPK format. Take a look at this tutorial if you are not sure how to perform this conversion.

On Linux or OS X, you can open a Terminal and run the following command:

$ ssh -i /path/to/your/private/key.pem bitnami@ec2-xx-xx-xx-amazonaws.com

You will see a welcome message similar to:


Below we will follow some of the steps in this guide.

The installation directory of BitNami JRuby in the AMI (and also in the virtual machines) is /opt/bitnami and you will need to login as root.

bitnami@ip-xx-xx-xx-xx:~$ sudo su
root@ip-xx-xx-xx-xx:/home/bitnami# cd /opt/bitnami
root@ip-xx-xx-xx-xx:/opt/bitnami# ./jrubyconsole


Now that we have loaded the BitNami environment, we can start using JRuby. Let's check the current version.

bash-4.2# jruby -v
jruby 1.7.0 (1.9.3p203) 2012-10-22 ff1ebbe on Java HotSpot(TM) 64-Bit Server VM 1.7.0_09-b05 [linux-amd64]


As you can see, JRuby is running in 1.9 mode which is the default for JRuby 1.7.

If you want to use Ruby 1.8 mode, you can add JRUBY_OPTS=--1.8 environment variable (you can find more details in the guide).

To launch Ruby applications with JRuby you can execute the following:

jruby -S command-name

or

jruby command-name

The switch -S indicates JRuby that should run following command from its binary directory (jruby/bin). For instance:

bash-4.2# jruby -S gem list

*** LOCAL GEMS ***

actionmailer (3.2.8)
actionpack (3.2.8)
activemodel (3.2.8)
activerecord (3.2.8)
ActiveRecord-JDBC (0.5)
activerecord-jdbc-adapter (1.2.2)
activerecord-jdbcmysql-adapter (1.2.2)
activerecord-jdbcsqlite3-adapter (1.2.2)
activeresource (3.2.8)
activesupport (3.2.8)
allison (2.0.3)
ansi (1.4.3)
arel (3.0.2)
bouncy-castle-java (1.5.0146.1)
builder (3.0.0)
bundler (1.1.5)
coffee-rails (3.2.2)
coffee-script (2.2.0)
coffee-script-source (1.3.3)
echoe (4.6.3)
erubis (2.7.0)
execjs (1.4.0)
highline (1.6.15)
hike (1.2.1)
hpricot (0.8.6 java)
i18n (0.6.0)
jdbc-mysql (5.1.13)
jdbc-sqlite3 (3.7.2)
journey (1.0.4)
jquery-rails (2.0.2)
jruby-jars (1.6.6)
jruby-openssl (0.7.6.1)
jruby-rack (1.1.3)
json (1.7.5 java)
json_pure (1.7.5)
mail (2.4.4)
mime-types (1.19)
multi_json (1.3.6)
mustache (0.99.4)
polyglot (0.3.3)
rack (1.4.1)
rack-cache (1.2)
rack-mount (0.8.3)
rack-ssl (1.3.2)
rack-test (0.6.1)
rails (3.2.8)
railties (3.2.8)
rake (0.9.2.2)
rdoc (3.12)
ronn (0.7.3)
rubyforge (2.0.4)
rubyzip (0.9.6.1)
sass (3.1.20)
sass-rails (3.2.5)
sprockets (2.4.5, 2.1.3)
therubyrhino (1.73.1)
thor (0.15.4)
tilt (1.3.3)
treetop (1.4.10)
turn (0.9.6)
tzinfo (0.3.33)
uglifier (1.2.6)
warbler (1.3.2)


However, if you want to run the scripts of your application, you will not use the -S switch. In this case, JRuby will look for the script in your actual directory. You can find a demo project in /opt/bitnami/projects/jrubystack.

bash-4.2# cd projects/jrubystack/
bash-4.2# jruby script/rails -h
Usage: rails COMMAND [ARGS]

The most common rails commands are:
generate Generate new code (short-cut alias: "g")
console Start the Rails console (short-cut alias: "c")
server Start the Rails server (short-cut alias: "s")
dbconsole Start a console for the database specified in config/database.yml
(short-cut alias: "db")
new Create a new Rails application. "rails new my_app" creates a
new application called MyApp in "./my_app"

In addition to those, there are:
application Generate the Rails application code
destroy Undo code generated with "generate" (short-cut alias: "d")
benchmarker See how fast a piece of code runs
profiler Get profile information from a piece of code
plugin Install a plugin
runner Run a piece of code in the application environment (short-cut alias: "r")

All commands can be run with -h (or --help) for more information.

bash-4.2# jruby script/rails server -p 80
=> Booting WEBrick
=> Rails 3.2.8 application starting in development on http://0.0.0.0:80
=> Call with -d to detach
=> Ctrl-C to shutdown server
[2012-10-29 16:59:58] INFO WEBrick 1.3.1
[2012-10-29 16:59:58] INFO ruby 1.9.3 (2012-10-22) [java]
[2012-10-29 16:59:58] INFO WEBrick::HTTPServer#start: pid=2156 port=80


Note that we are launching the development server in port 80. This is because, by default, port 3000 (the default for rails server) will not be accessible in the AMI if you didn't enable it in the security group (which for security reasons is good).

Once you have developed your application, you can also create a .war file to run it on Tomcat. For that, you can user the warbler gem (also included in the stack).

bash-4.2# jruby -S warble config
cp /opt/bitnami/jruby/lib/ruby/gems/1.9/gems/warbler-1.3.2/warble.rb config/warble.rb
bash-4.2# jruby -S warble war
rm -f jrubystack.war
Creating jrubystack.war
bash-4.2# cp jrubystack.war /opt/bitnami/apache-tomcat/webapps/


In the AMI and virtual machines, you will need to change the permissions to the .war file to allow the user tomcat to deploy it.

bash-4.2# chown -R tomcat.tomcat /opt/bitnami/apache-tomcat/webapps/jrubystack.war


The jrubystack demo project is configured with MySQL. We now need to make sure that both Tomcat and MySQL are started.

bash-4.2# /opt/bitnami/ctlscript.sh restart
/opt/bitnami/apache-tomcat/scripts/ctl.sh : tomcat not running
/opt/bitnami/mysql/scripts/ctl.sh : mysql stopped
/opt/bitnami/mysql/scripts/ctl.sh : mysql started at port 3306
/opt/bitnami/apache-tomcat/scripts/ctl.sh : tomcat started


The jrubystack war file should have been deployed in Tomcat and the application should be accessible in http://ec2-xx-xx-xx-amazonaws.com/jrubystack

Now that you are running your server in the cloud, you can easily migrate it into BitNami Cloud Hosting and get additional services like scheduled backup, start/stop policy and monitoring. If you want to import your JRuby server to BitNami Cloud Hosting to take advantage of these services, view our tutorial. Our developer plan in BitNami Cloud Hosting allows you to deploy and manage one micro instance for free!

The JRuby team has mentioned that it plans on putting out point releases of 1.7.x every 2-3 weeks for the foreseeable future. Keep an eye on BitNami for getting the read-to-run BitNami Stacks with the latest versions!


Wednesday, October 24, 2012

Run Liferay Enterprise Edition in the Cloud with BitNami


We are happy to announce that you can now run Liferay Enterprise Edition in the cloud with BitNami! We have partnered with Liferay to provide one click deployment and simplified management of the enterprise portal on the Amazon Cloud with BitNami Cloud Hosting.


If you are not familiar with it, Liferay is a complete, Java-based portal platform. It can be used as a web content management system, an integration platform, a collaboration platform, a social application platform or any combination thereof. Liferay customers range from federal agencies and major investment banks to media and branding-rich organizations like Sesame Street.

BitNami Cloud Hosting is a platform that simplifies the deployment and management of web applications in the cloud. It provides one-click application deployment, automatic incremental backups, resizing, server scheduling, monitoring, cloning and other features that enable businesses to deploy and manage applications in the cloud. Now that Liferay is included in the BitNami Cloud Hosting library, you can have a complete Liferay platform up and running in the cloud in minutes. Snapshot functionality makes it easy to make copies of production servers to test upgrades before deploying them or to develop new features separate from the production environment. 

To learn more, download our free joint whitepaper, "Running Liferay in the Cloud with BitNami".

You can sign up for BitNami Cloud Hosting at: http://bitnami.org/cloud and for a free trial of Liferay Enterprise at: http://www.liferay.com/bitnami-trial

Updated BitNami Django Stack


We have just released a new version of BitNami Django Stack. BitNami DjangoStack greatly simplifies the development and deployment of Django applications. It includes ready-to-run versions of Apache, MySQL, PostgreSQL, SQLite, Python and required dependencies, as well as the boto Python package that provides interfaces to Amazon Web Services. It can be deployed all-in-one free native installers, virtual machines and Amazon Cloud Images.

This version includes Django 1.4.2 which includes security fixes. For more details please visit https://www.djangoproject.com/weblog/2012/oct/17/security/.

We have also updated boto to 2.6.0 which adds support for Amazon Glacier, support for AWS Elastic Beanstalk, CORS support for Amazon S3, support for Reserved Instances Resale in Amazon EC2 and support for IAM Roles.

Enjoy!


Tuesday, October 23, 2012

Vote for Your Favorite Apps to Become BitNami Packages

You may have noticed in the past that we had a simple voting mechanism on BitNami that would let you tell us which applications you wanted to see added to the BitNami library. This was a great way for us to gather user feedback and we packaged several applications as a result. We are excited to announce that we are taking this concept a step further and committing to package a new app every 2 weeks based solely on your votes. The app with the most votes at the end of each two week period will be added to the BitNami Library! That's right - vote for your favorite applications (and tell your friends to vote too!) and, if it is the winning app, within a month you will get free installers, virtual machines and Amazon Machine Images (AMIs) for it. At the end of each two week period, the votes will be reset to zero so that every app has a fair chance in every contest.

Here is how it works:

Step 1: Visit the BitNami Contest page. This page displays the current top-voted apps. Do you see your favorite app listed? Click on the 'vote' button to vote for it.


Step 2: To help your app climb to the top of the list, use the share buttons to tell your friends to vote via Facebook, Twitter, Google+, etc.


That's it! At the end of every two week period, we will take the app with the most votes and create a BitNami Stack for it. It will be added to our library, so we will keep the new BitNami Stack up to date as new versions of the application and dependencies are released.

If you don't see the app you want us to add on the list, visit our search page and either click on the app in the list or type the name into the search box. If the app is already in our catalog, you will be able to vote for it. It will be moved onto the Contest page when it has enough votes. You will also see a link to add a new app if the app you are looking for is not in our catalog.

Note that we are currently only offering the contest for PHP-based applications. In the near future, we will be providing support for Python, Rails and Java-based applications as well. To be considered, the application needs to be available under a suitable license such as the GPL or the Apache license. We encourage community-oriented open source projects to participate. If you are a commercial open source company we encourage to contact us directly if you want us to package your software. Any attempt to game the system or manipulate the polls (i.e. writing a bot) will result in disqualification.

Which app will be next to join the BitNami library? That is up to you!

Friday, October 19, 2012

Get started with Laravel in the Amazon Cloud


We recently released BitNami LAMP WAMP and MAMP Stacks with Laravel 3.2.10, a popular development framework (the *AMP Stacks also bundle other frameworks like ZendFramework, CodeIgniter, Symfony or CakePHP). According to its website, Laravel is "A clean and classy framework for PHP web development. Freeing you from spaghetti code, Laravel helps you create wonderful applications using simple, expressive syntax.". In this post, we will walk you step by step through how to start a project with Laravel in the Amazon Cloud using a BitNami LAMP Stack AMI.


First, you will need an Amazon account to access the Amazon Web Services (AWS) Console. Instructions on how to create your account can be found here (note that Amazon offers a free tier which provides you with a free micro instance for a year). Once you login to the AWS Console, go to the EC2 tab and launch a new Instance. You can locate the BitNami LAMP Stack image by searching in the Community AMIs tab for "lampstack-5.3.17-1", which is the latest version at the time of this writing.


Community AMIs in AWS console


Another option is to launch your AMI directly from the BitNami website (click on the button for either the LAMP or LAPP Stack towards the bottom of the page). You can select your preferred region (United States, Europe or Asia) from the drop down menu and the architecture (32 or 64 bits) and click on the appropriate link. Then, you can set different parameters from the AWS Console: availability zone, ssh key, the image type (micro, small, medium) and the security group. Once the machine is started, access it by typing the public DNS name in a browser. You should see something similar to the screenshot below.


LAMP welcome page

The next step involves connecting to the machine. You can download the private SSH key from your Amazon account. If you want to connect to the machine from Windows using the popular tool Putty, you will need to convert your private key to the .PPK format. Take a look at this tutorial if you are not sure how to perform this conversion.

On Linux or OS X, you can open a Terminal and run the following command:

$ ssh -i /path/to/your/private/key.pem bitnami@ec2-xx-xx-xx-amazonaws.com

You will see a welcome message similar to:

BitNami welcome message


All of the required files for the Laravel framework are in the "/opt/bitnami" folder:

ctlscript.sh: It is the main script to start and stop the servers.
frameworks/laravel: The Laravel framework files.
apache2: The Apache server files.
php: The PHP language files.
mysql: The MySQL database files.

One of the advantages of this structure is that you can install the BitNami LAMP Stack on your desktop machine using either the BitNami installers for virtual appliances and develop your application locally, then migrate the full directory directly to the cloud when you are ready to put it into production.

You can edit the files online with a command line editor (nano, vim, emacs) but many people prefer to edit files with a graphical editor locally. Using an SFTP client like FileZilla, you can edit the files from your computer. If you need help, see our how-to for configuration instructions.

A simple way to start learning Laravel is via the Quick Tour that you can access via web. To enable it, you should uncomment the following line that you can find in the Apache configuration file /opt/bitnami/apache2/conf/httpd.conf:

Include "/opt/bitnami/frameworks/laravel/conf/laravel.conf"

and restart the Apache server:

$ ./ctlscript.sh restart apache

Laravel framework welcome page

That's all! You can configure the database settings in the "application/config/database.php" file. You can find more info about the Laravel configuration here.

Thursday, October 18, 2012

Joomla! 3 is Now Available from BitNami


We are pleased to announce that the newly released Joomla 3 is now available on BitNami!  The BitNami Joomla! 3 stack is recommended for developers and early adopters. As with all BitNami Stacks, you can deploy it for free in one click on your own computer, in a virtual machine or on Amazon cloud.

A few of the major improvements in this latest release of Joomla! are:

    • Mobile-ready, both for visitors and administrative areas.
    • Improved, more user friendly interface for the admin panel.
    • Developer tools that give you standardized back-end and front-end interfaces.
    • jQuery support.

Because all BitNami Stacks are completely self-contained and ready-to-run, they make it very easy to try the latest versions of your favorite open source applications without compromising the rest of your operating environment. They can also be removed from your system in minutes by either deleting the VM or running the uninstaller that is bundled with all native installers.

In addition to the BitNami native installers, VMs and AMIs, we also provide simplified deployment and management of Joomla! in the cloud with BitNami Cloud Hosting. Our cloud hosting platform allows you to add multiple applications to your cloud servers, choose from multiple operating systems, have greater flexibility around the machine specifications and provides automatic backups, built-in monitoring, one click cloning, multi-account management and other features that make it easier to run your favorite BitNami apps on the Amazon Cloud. Sign up for our free developer plan to check it out!

Joomla! 3 control panel
Joomla! 3 welcome page

Tuesday, October 16, 2012

New BitNami Alfresco 4.2 released

We are happy to announce a new BitNami Alfresco Stack version: 4.2.a. BitNami Alfresco provides all-in-one free native installers, virtual machines and Amazon Cloud Images that simplify Alfresco installation. 

In addition to this, we also provide simplified deployment and management of Alfresco in the cloud with BitNami Cloud Hosting. Sign up for our free developer plan to check it out!

This version upgrades the following components:
    • Alfresco 4.2.a
    • JDK 1.7.0_07
    • Apache Tomcat 7.0.32
    • LibreOffice 3.5.4


Alfresco admin panel
Alfresco repository

Friday, October 12, 2012

BitNami Cloud Tools Now with s3cmd

We are happy to announce a new addition to the lastest BitNami Cloud Tools version (v1.6): s3cmd tool. Thanks to user suggestions, we added this useful tool and its required dependencies to assist with uploading, retrieving and managing data in Amazon S3.

The BitNami Cloud Tools installer packages the Amazon Web Services (AWS) command line tools together with pre-configured Java, Ruby, Python and Perl language runtimes. It is a self-contained, easy to use distribution that makes it simple to get started using AWS services from the command line.

Previous versions already included the following components:
  • EC2 API to register and launch instances, manipulate security groups, and more.
  • EC2 AMI to help bundle an Amazon Machine Images (AMIs).
  • AutoScaling to create auto scaling groups and define triggers to launch and terminate Amazon EC2 instances automatically.
  • CloudWatch to monitor, manage, and publish Amazon CloudWatch metrics, as well as configure alarms.
  • CloudFormation to create and delete stacks and to view resources and events associated with a stack.
  • Simple Notification Service
  • Simple Email Service and more!
You can check the full component list and versions at http://bitnami.org/tools/cloud

With the new s3cmd tool, you can easily manage your data in an Amazon S3 bucket. For example:

Start the Cloud Tools environment on Linux or OS X:

$ cd installation_directory
$ ./aws-shell.sh

Or you can also start the "aws-cmd" command prompt from the Start menu on Windows.

Create a new bucket:

$ s3cmd mb s3://my-new-bucket

Upload a new file to your bucket:

$ s3cmd put example.txt s3://my-new-bucket

List the elements:

$ s3cmd ls s3://my-new-bucket/

Download the file:

$ s3cmd get s3://my-new-bucket/example.txt

In addition to this, s3cmd lets you encrypt your files before sending them to Amazon or use HTTPS for encrypting the communication. Enjoy!

Wednesday, October 10, 2012

New BitNami Stack for Plone!

We are happy to announce a new addition to the BitNami Application Library, Plone CMS. It is a free and open source content management system built with Python on top of the Zope application server. Plone can be used for all types of websites, including blogs, internet sites, webshops and internal websites.

The BitNami Plone Stack simplifies the installation and configuration process of Plone and its dependencies. It includes a pre-configured version of Plone 2.4.1, Python 2.7, Apache 2.2 and all other required dependencies.

The BitNami Plone Stack is configured for both development and production environments. The default configuration is the following:
  • Apache is configured as a proxy server. It is running in the default port (80 or 8080) and you can also configure it for serving your static content in production.
  • Zope is running as a one instance cluster. You can easily add more instances to the cluster in your production environment. It is running in port 8081 by default.
  • Zeo server is running in port 8100 by default.
Once you have downloaded and installed the free native installer, virtual machine or deployed the Amazon Machine Images (AMI's) in the cloud, you can access the Zope management interface and create your first Plone site.

Zope management interface
New Plone site

Check our Quick Start Guide to learn more about how to start working with your BitNami Plone deployment. 

We also provide simplified deployment and management of Plone in the cloud with BitNami Cloud Hosting. Sign up for our free developer plan to check it out!

Wednesday, October 3, 2012

New RubyStack for Ruby On Rails Developers

We are happy to announce a new version of BitNami RubyStack. If you are not familiar with RubyStack, it is a self-contained, easy to use distribution with one goal in mind: to make it simple to get started developing Ruby On Rails applications. BitNami RubyStack is available in the form of free, ready-to-run installers, virtual machine images (VMs) and Amazon Machine Images (AMIs) for the Amazon Cloud.

The following versions of BitNami RubyStack are now available on the RubyStack download page:
  • 1.8.7-0:  It ships Ruby 1.8.7 and Rails 2.3.14
  • 1.9.3-0:  with Ruby 1.9.3 and Rails 3.2.8
These Stacks also include RVM, so it is possible to install any Ruby version on top of any of the Stacks. Check our RVM quick guide to know how to install more Ruby versions. In addition to the Ruby runtime and its dependencies, BitNami RubyStack ships the components listed below:

- Apache 2.2.22 with Passenger module
- NGinx 1.3.4 with Passenger module
- MySQL 5.5.21
- Git 1.7.11.3
- Subversion 1.7.5
- Sphinx 2.0.4
- SQLite 3.7.10
- Memcached 1.4.13
- Varnish 3.0.1
- DevKit for Windows
- PHP and phpMyAdmin (optional)

To simplify the process even more, RubyStack also installs and configures most popular Ruby gems:

- Bundler
- MySQL
- SQLite
- Nokogiri
- Passenger
- RMagick
- Mongrel and Thin
- and more.

One of the improvements in this version of RubyStack is that the dependencies for gems that require compilation are already bundled and pre-configured so they will run out of the box. If you need a different version of one of the gems, you can run the "bundle install" command and it will be automatically download, compile and install the gem in your RubyStack.

In addition, we have also been working on improving our documentation. There is a new Quick Start Guide that addresses the most common questions that we get about BitNami RubyStack. You will also find a step-by-step guide on how to create your first Ruby On Rails project on top of RubyStack. For more advanced users, you can will also find information on how to deploy your application with Passenger in production environments.

Welcome page


In addition to BitNami Stacks, we provide simplified deployment and management of Ruby on Rails development environments in the cloud with BitNami Cloud Hosting. Sign up for our free developer plan to check it out!