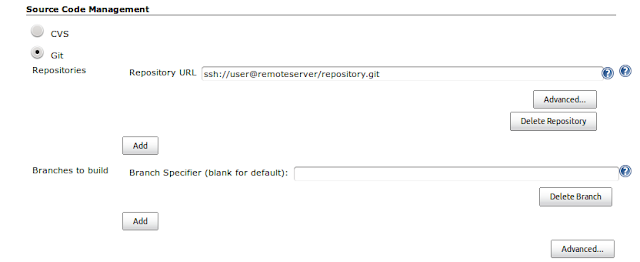
Jenkins can clone git repositories as source code for building one or more tasks, similar to how it works for cvs and subversion. With git, it is possible to both have Jenkins check the git repository for changes periodically and set up a hook to notify Jenkins about a commit. Setting up Jenkins to poll periodically is easier and therefore we will use this method in this example. Setting up push notifications is intended for more experienced git and Jenkins users and is described in the push notification from repository section of the Jenkins Git Plugin homepage.
To get started, we can create a new task that will use git as its source code repository. The 'Source Code Management' section of new and existing tasks will now allow selecting 'Git' for source code. We can set up local repositories by specifying the directory of the repository as well as remote repositories using the URL in the form of 'ssh://user@remoteserver/repository.git'. Some servers provide read-only access using git protocol - such as GitHub, where it is 'git://github.com/username/repository.git'.
For a simple repository with just the 'master' branch, that will be enough for Jenkins to retrieve the source code and automatically build it.
We can also set up Jenkins to poll the SCM for changes. To do this, simply go to 'Build Triggers' and enable 'Poll SCM'. This causes a text area for providing a schedule to be shown. The format is same as in 'crontab', so '*/5 * * * *' causes Jenkins to check for changes every 5 minutes.
We should also set up how our application is built. For this example, we can simply create 'script.sh' in our git repository, set its permissions to '0755' and run it from Jenkins to build our application. To do this, go to the 'Build' section of the task, choose 'Execute shell' from the 'Add build step' dropdown and specify the shell script to run:
One very interesting feature of the Jenkins git plugin is that it can be used to build any branch. By default the 'Branch Specifier' is empty, which indicates Jenkins should check all branches for changes. This may be convenient for some branches - such as 'master' being the current version and 'legacy' being the previous version, which is still being maintained. If more than one branch is modified, Jenkins runs multiple builds for the task - one for each branch.
However, in many cases not all branches should be built whenever a change occurs. To only build the two branches above, we can set 2 branch specifiers as follows:
With this setup, whenever a change is pushed to 'master' or 'legacy' branch, they are automatically built when Jenkins fetches the changes and detects an update.


