
The BitNami JRuby Stack now defaults to 1.9 mode, but it is both Ruby 1.8 & Ruby 1.9 compatible and both versions of Ruby are bundled in a single install. JRuby 1.7 is the first release to support the new “invokedynamic” feature of the JVM. For more details, see the JRuby Release notes.
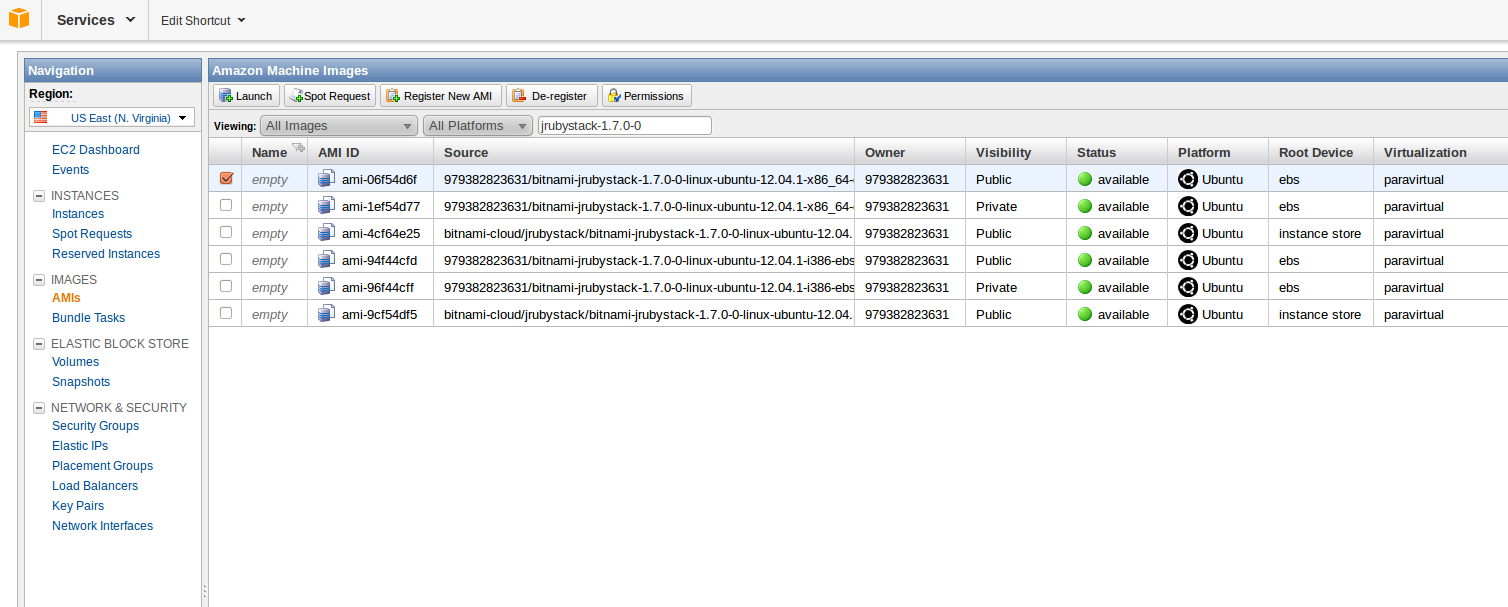
Let's take a quick look at the latest JRuby release. For that, we will launch a BitNami JRuby Stack AMI. Later, we can use this same AMI to host our application in production in the cloud. To follow along, you will need an Amazon account to access the Amazon Web Services (AWS) Console. Instructions on how to create your account can be found here (note that Amazon offers a free tier which provides you with a free micro instance for a year). Once you login to the AWS Console, go to the EC2 tab and launch a new Instance. You can locate the BitNami JRuby Stack image by searching in the Community AMIs tab for "jrubystack-1.7.0-0", which is the latest version at the time of this writing.
Another option is to launch your AMI directly from the BitNami website. Select your preferred region (United States, Europe or Asia) from the drop down menu and the architecture (32 or 64 bits) and click on the appropriate link as shown in the image below.

Then, you can set different parameters from the AWS Console, such as: availability zone, ssh key, the image type (micro, small, medium, etc) and the security group. Once the machine is started, access it by typing the public DNS name in a browser. You should see something similar to the screenshot below.

The next step involves connecting to the machine. You can download the private SSH key from your Amazon account. If you want to connect to the machine from Windows using the popular tool Putty, you will need to convert your private key to the .PPK format. Take a look at this tutorial if you are not sure how to perform this conversion.
On Linux or OS X, you can open a Terminal and run the following command:
$ ssh -i /path/to/your/private/key.pem bitnami@ec2-xx-xx-xx-amazonaws.com
You will see a welcome message similar to:

Below we will follow some of the steps in this guide.
The installation directory of BitNami JRuby in the AMI (and also in the virtual machines) is /opt/bitnami and you will need to login as root.
bitnami@ip-xx-xx-xx-xx:~$ sudo su

root@ip-xx-xx-xx-xx:/home/bitnami# cd /opt/bitnami

root@ip-xx-xx-xx-xx:/opt/bitnami# ./jrubyconsole
Now that we have loaded the BitNami environment, we can start using JRuby. Let's check the current version.
bash-4.2# jruby -v

jruby 1.7.0 (1.9.3p203) 2012-10-22 ff1ebbe on Java HotSpot(TM) 64-Bit Server VM 1.7.0_09-b05 [linux-amd64]
As you can see, JRuby is running in 1.9 mode which is the default for JRuby 1.7.
If you want to use Ruby 1.8 mode, you can add
JRUBY_OPTS=--1.8 environment variable (you can find more details in the guide).To launch Ruby applications with JRuby you can execute the following:
jruby -S command-nameor
jruby command-nameThe switch
-S indicates JRuby that should run following command from its binary directory (jruby/bin). For instance:
bash-4.2# jruby -S gem list


*** LOCAL GEMS ***


actionmailer (3.2.8)

actionpack (3.2.8)

activemodel (3.2.8)

activerecord (3.2.8)

ActiveRecord-JDBC (0.5)

activerecord-jdbc-adapter (1.2.2)

activerecord-jdbcmysql-adapter (1.2.2)

activerecord-jdbcsqlite3-adapter (1.2.2)

activeresource (3.2.8)

activesupport (3.2.8)

allison (2.0.3)

ansi (1.4.3)

arel (3.0.2)

bouncy-castle-java (1.5.0146.1)

builder (3.0.0)

bundler (1.1.5)

coffee-rails (3.2.2)

coffee-script (2.2.0)

coffee-script-source (1.3.3)

echoe (4.6.3)

erubis (2.7.0)

execjs (1.4.0)

highline (1.6.15)

hike (1.2.1)

hpricot (0.8.6 java)

i18n (0.6.0)

jdbc-mysql (5.1.13)

jdbc-sqlite3 (3.7.2)

journey (1.0.4)

jquery-rails (2.0.2)

jruby-jars (1.6.6)

jruby-openssl (0.7.6.1)

jruby-rack (1.1.3)

json (1.7.5 java)

json_pure (1.7.5)

mail (2.4.4)

mime-types (1.19)

multi_json (1.3.6)

mustache (0.99.4)

polyglot (0.3.3)

rack (1.4.1)

rack-cache (1.2)

rack-mount (0.8.3)

rack-ssl (1.3.2)

rack-test (0.6.1)

rails (3.2.8)

railties (3.2.8)

rake (0.9.2.2)

rdoc (3.12)

ronn (0.7.3)

rubyforge (2.0.4)

rubyzip (0.9.6.1)

sass (3.1.20)

sass-rails (3.2.5)

sprockets (2.4.5, 2.1.3)

therubyrhino (1.73.1)

thor (0.15.4)

tilt (1.3.3)

treetop (1.4.10)

turn (0.9.6)

tzinfo (0.3.33)

uglifier (1.2.6)

warbler (1.3.2)
However, if you want to run the scripts of your application, you will not use the -S switch. In this case, JRuby will look for the script in your actual directory. You can find a demo project in /opt/bitnami/projects/jrubystack.
bash-4.2# cd projects/jrubystack/

bash-4.2# jruby script/rails -h

Usage: rails COMMAND [ARGS]


The most common rails commands are:

 generate    Generate new code (short-cut alias: "g")

 console     Start the Rails console (short-cut alias: "c")

 server      Start the Rails server (short-cut alias: "s")

 dbconsole   Start a console for the database specified in config/database.yml

             (short-cut alias: "db")

 new         Create a new Rails application. "rails new my_app" creates a

             new application called MyApp in "./my_app"


In addition to those, there are:

 application  Generate the Rails application code

 destroy      Undo code generated with "generate" (short-cut alias: "d")

 benchmarker  See how fast a piece of code runs

 profiler     Get profile information from a piece of code

 plugin       Install a plugin

 runner       Run a piece of code in the application environment (short-cut alias: "r")


All commands can be run with -h (or --help) for more information.


bash-4.2# jruby script/rails server -p 80

=> Booting WEBrick

=> Rails 3.2.8 application starting in development on http://0.0.0.0:80

=> Call with -d to detach

=> Ctrl-C to shutdown server

[2012-10-29 16:59:58] INFO  WEBrick 1.3.1

[2012-10-29 16:59:58] INFO  ruby 1.9.3 (2012-10-22) [java]

[2012-10-29 16:59:58] INFO  WEBrick::HTTPServer#start: pid=2156 port=80
Note that we are launching the development server in port 80. This is because, by default, port 3000 (the default for rails server) will not be accessible in the AMI if you didn't enable it in the security group (which for security reasons is good).
Once you have developed your application, you can also create a .war file to run it on Tomcat. For that, you can user the warbler gem (also included in the stack).
bash-4.2# jruby -S warble config

cp /opt/bitnami/jruby/lib/ruby/gems/1.9/gems/warbler-1.3.2/warble.rb config/warble.rb

bash-4.2# jruby -S warble war

rm -f jrubystack.war

Creating jrubystack.war

bash-4.2# cp jrubystack.war /opt/bitnami/apache-tomcat/webapps/
In the AMI and virtual machines, you will need to change the permissions to the .war file to allow the user tomcat to deploy it.
bash-4.2# chown -R tomcat.tomcat /opt/bitnami/apache-tomcat/webapps/jrubystack.war
The jrubystack demo project is configured with MySQL. We now need to make sure that both Tomcat and MySQL are started.
bash-4.2# /opt/bitnami/ctlscript.sh restart

/opt/bitnami/apache-tomcat/scripts/ctl.sh : tomcat not running

/opt/bitnami/mysql/scripts/ctl.sh : mysql stopped

/opt/bitnami/mysql/scripts/ctl.sh : mysql  started at port 3306

/opt/bitnami/apache-tomcat/scripts/ctl.sh : tomcat started
The jrubystack war file should have been deployed in Tomcat and the application should be accessible in
http://ec2-xx-xx-xx-amazonaws.com/jrubystackNow that you are running your server in the cloud, you can easily migrate it into BitNami Cloud Hosting and get additional services like scheduled backup, start/stop policy and monitoring. If you want to import your JRuby server to BitNami Cloud Hosting to take advantage of these services, view our tutorial. Our developer plan in BitNami Cloud Hosting allows you to deploy and manage one micro instance for free!
The JRuby team has mentioned that it plans on putting out point releases of 1.7.x every 2-3 weeks for the foreseeable future. Keep an eye on BitNami for getting the read-to-run BitNami Stacks with the latest versions!


