
[UPDATE 2017-01-11]
The steps to restrict access to port 27017 on Google Cloud Platform have been updated
[UPDATE 2017-01-10]
The Bitnami Team has been working on creating new guides to securing the database and recovering the data using MongoDB Oplog. Please find below the "How to enable authentication for securing your installation" and "Restoring your database" sections below.
In the past few days, it has been reported that attackers have been scanning for and vandalizing unsecured MongoDB databases accessible over the internet. (See https://www.scmagazine.com/mongodb-databases-under-attack-worldwide/article/629601/)
Our security team follows these reports closely and began a review of our existing images. As a result, we confirmed Bitnami virtual machines and single cloud images are not vulnerable to this attack because they require the administrator to authenticate. However, one Bitnami listing is vulnerable when left in it’s default configuration: Bitnami’s MongoDB with Replication. This template is offered in Google Cloud Launcher and Microsoft Azure.
We are working with Google to remove and replace the template on the Google Cloud Launcher. If you launch or have launched a “MongoDB with Replication” application prior to version 3.4.1, please take immediate steps to secure your application, instructions below.
For Microsoft Azure users, a replacement template, which implements MongoDB authentication to prevent users from remotely performing CRUD operations on the database, is available now in the Azure Marketplace here. The fixed template version is MongoDB 3.4.1-0 (Debian 8).
While the scale of the attack across the internet was large, only a small number of Bitnami users were affected and not already secured. We are working with the cloud vendors to contact these users and replace the default settings. In the meantime, if you think your installation could be affected, please see below for steps that you can take to safeguard your data.
If you are currently using installations based on the Bitnami MongoDB with Replication template that have not already been secured:
The following steps are recommended immediately
1. Restricting external access to default port 27017
2. Enabling authentication to secure your installation
3. Restoring your database
How to restrict access to port 27017 on Google Cloud Platform
1. Login to Google Cloud Platform.
2. Using the left hand menu, navigate to the “Networking” section.
3. Under the networking section choose “Firewall Rules”.

In this section find the firewall rules that correspond with your MongoDB instance. If you launched through the Google Cloud Launcher the name is likely to be “mongodb-multivm-1-node-0-firewall”.
4. Click on the 'Firewall Rule Details' for each MongoDB instance to show firewall rules details:

5. Remove port 27017 from the list of allowed protocols and ports. Remove the bitnami-mongodb tag if it is set.
6. Click “Save”.
 7. Using the left hand menu, navigate to the “Compute Engine” section. In this section find the instances that correspond with your MongoDB deployment. Look for the different nodes of the deployment, if you launched through the Google Cloud Launcher the name is likely to be “mongodb-multivm”.
8. Remove the bitnami-mongodb tag in all the instances if it is set.

9. Click “Save”.
While the scale of the attack across the internet was large, only a small number of Bitnami users were affected and not already secured. We are working with the cloud vendors to contact these users and replace the default settings. In the meantime, if you think your installation could be affected, please see below for steps that you can take to safeguard your data.
If you are currently using installations based on the Bitnami MongoDB with Replication template that have not already been secured:
The following steps are recommended immediately
1. Restricting external access to default port 27017
2. Enabling authentication to secure your installation
3. Restoring your database
How to restrict access to port 27017 on Google Cloud Platform
1. Login to Google Cloud Platform.
2. Using the left hand menu, navigate to the “Networking” section.
3. Under the networking section choose “Firewall Rules”.
In this section find the firewall rules that correspond with your MongoDB instance. If you launched through the Google Cloud Launcher the name is likely to be “mongodb-multivm-1-node-0-firewall”.
4. Click on the 'Firewall Rule Details' for each MongoDB instance to show firewall rules details:
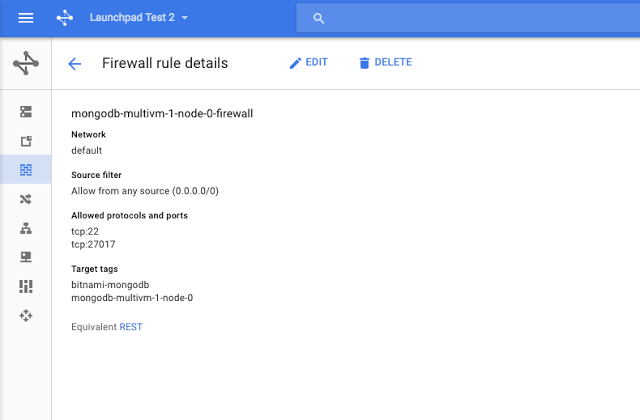
5. Remove port 27017 from the list of allowed protocols and ports. Remove the bitnami-mongodb tag if it is set.
8. Remove the bitnami-mongodb tag in all the instances if it is set.
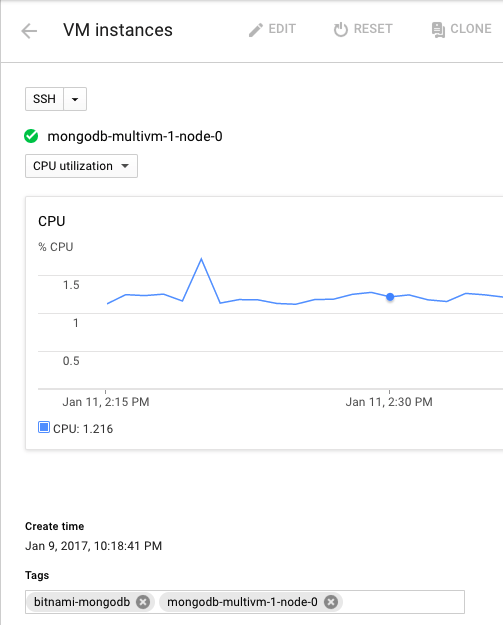
9. Click “Save”.


