Friday, January 27, 2012

Get started with Symfony in Amazon Cloud

We recently released BitNami LAMP WAMP and MAMP Stacks with Symfony 2.0.9, a popular development framework (the *AMP Stacks also bundle other frameworks like ZendFramework, CodeIgniter and CakePHP). In this post, we will walk you step by step through how to start a project with Symfony in the Amazon Cloud using a BitNami LAMP Stack AMI.

First, you will need an Amazon acount to access the AWS Console. You can find how to create your account here (note that they have a free tier which provides you with a free micro instance for a year). Once you login to the AWS Console, go to the EC2 tab and launch a new Instance. You can locate the BitNami LAMP Stack image by searching in the Community AMIs tab for "lampstack-5.3.9-0", which is the latest version at the time of this writing.


AWS Community AMIs

Another option is to launch directly from the BitNami website. You can select your preferred region (United States, Europe or Asia) and the architecture (32 or 64 bits) and click on the appropriate link. Then, you can set different parameters from the AWS Console: availability zone, ssh key, the image type (micro, small, medium) and the security group. Once the machine is started, access it by typing the public DNS name in a browser. You should see something similar to the screenshot below.

LAMPStack welcome page


The next step involves connecting to the machine. You can download the private SSH key from your Amazon account. If you want to connect to the machine from Windows using the popular tool Putty, you will need to convert your private key to the .PPK format. Take a look at this tutorial if you are not sure how to perform this conversion.

On Linux or OS X, you can open a Terminal and run the following command:

$ ssh -i /path/to/your/private/key.pem bitnami@ec2-xx-xx-xx-amazonaws.com

You will see a welcome message similar to:

BitNami welcome message


All the required files for the Symfony framework are in the "/opt/bitnami" folder:

ctlscript.sh: It is the main script to start and stop the servers.
frameworks/symfony: The Symfony 2 framework files.
apache2: The Apache server files.
php: The PHP language files.
mysql: The MySQL database files.

One of the advantages of this structure is that you can install the BitNami LAMP Stack on your own desktop machine, develop your application locally and then migrate the full directory directly to the cloud.

You can edit the files online with a command line editor (nano, vim, emacs) but many people prefer to edit files with a graphical editor locally. Using an SFTP client like FileZilla, you can edit the files from your computer. If you need help, see our how-to for configuration instructions.

In the first place, you can check the requirements:

$ cd /opt/bitnami/frameworks/symfony/app
$ php check.php

You will see a message similar to:

********************************
*                              *
*  Symfony requirements check  *
*                              *
********************************

php.ini used by PHP: /opt/bitnami/php/etc/php.ini

** WARNING **
*  The PHP CLI can use a different php.ini file
*  than the one used with your web server.
*  If this is the case, please ALSO launch this
*  utility from your web server.
** WARNING **

** Mandatory requirements **

  OK        Checking that PHP version is at least 5.3.2 (5.3.9 installed)
  OK        Checking that the "date.timezone" setting is set
  OK        Checking that app/cache/ directory is writable
  OK        Checking that the app/logs/ directory is writable
  OK        Checking that the json_encode() is available
  OK        Checking that the SQLite3 or PDO_SQLite extension is available
  OK        Checking that the session_start() is available
  OK        Checking that the ctype_alpha() is available
  OK        Checking that the token_get_all() is available
  OK        Checking that the APC version is at least 3.0.17

** Optional checks **

  OK        Checking that the PHP-XML module is installed
  ...


A simple way to start learning Symfony is via the Quick Tour that you can access via web. To enable it, you should uncomment the following line that you can find in the Apache configuration file /opt/bitnami/apache2/conf/httpd.conf:

Include "/opt/bitnami/frameworks/symfony/conf/symfony.conf"

and restart the Apache server:

$ ./ctlscript.sh restart apache

The Symfony welcome application is only accessible from localhost. In this case you can create a SSH tunnel to access the application. You can check how to access phpMyAdmin or Symfony application here.

Symfony welcome page

That's all! You can configure the database settings in the parameters.ini file or you be able to change the configuration via web.


Wednesday, January 25, 2012

New RubyStack upgraded to Rails 3.2.0

We are happy to announce a new version of BitNami RubyStack that includes the latest version of Rails, 3.2.0.

BitNami RubyStack simplifies the development and deployment of Ruby on Rails applications for development, testing and production. It can be deployed using a native installer, as a virtual machine or in the Amazon cloud.

This Stack ships, among others, the following components, providing a complete Rails environment out of the box:
  • Ruby 1.9.3-p0
  • Rails 3.2.0
  • SQLite 3.7.3
  • Apache 2.2.21
  • PHP 5.3.9
  • MySQL 5.5.16 for Linux and OS X
  • phpMyAdmin 3.4.9
  • NGinx 1.0.10
  • Git 1.7.8
  • Subversion 1.7.1
  • Phusion Passenger 3.0.11
  • Memcached 1.4.5
Don't forge to check our updated quick start guide in PDF where you can learn how to create your own Ruby On Rails project on top of this BitNami Stack. Enjoy!


New BitNami Joomla! 2.5.0 released

We are happy to announce the recently released Joomla! 2.5.0 version is now available as a BitNami stack. This Joomla! version is a security and long-term-support (LTS) release that will be supported for at least 18 months. You can download a native installer, a virtual machine or deploy it directly to the Amazon cloud. BitNami stacks simplify the deployment and testing of open source web apps and are an ideal method to test the latest releases of your favorite projects, including Joomla!

There are a lot of improvements in this release. Some highlights include:

  • Support for additional databases, including Microsoft SQL server.
  • Notifications for Joomla! and module updates.
  • New much improved search engine
We will work on adding support for multiple languages in future releases. Enjoy!

Monday, January 23, 2012

BitNami Cloud Tools now supports DynamoDB

Last week, Amazon AWS release DynamoDB. This is a fully managed NoSQL database service that provides fast and predictable performance with seamless scalability.

Like a lot of other developers, we were quite excited about this piece of news. We are happy to announce a new version of BitNami Cloud Tools with the latest version of the AWS SDKs that support the DynamoDB service. This installer is a collection of the most popular command line tools for the Amazon API: EC2, Beanstalk, ELB, RDS, SES and so on. The installer ships all of the required dependencies to provide you with a fully configured environment for every Amazon API, including a JDK, Perl and Ruby runtimes, etc. 

Here is the list of upgrades for the 1.3-1 version:

- Update aws-ec2-api 1.5.2.3
- Update aws-sdk-ruby 1.3.2
- Update aws-sdk-java 1.3.0

BitNami Cloud Tools is available for Windows, Linux and OS X. Download it now.

Wednesday, January 18, 2012

New BitNami RubyStack with Rails 3.1.3 released


We are happy to announce two new releases of BitNami RubyStack.The new releases contain different versions of Ruby and Rails, so you can choose the BitNami Stack that best meets your development needs. Both BitNami RubyStack versions allow you to setup instant Ruby On Rails development and testing environments locally in your desktop/laptop for Windows, Linux, OS X or in the Cloud.


Both versions ship the latest versions of the most popular components: Apache 2.2.21, MySQL 5.5.16, NGinx 1.0.10, Subversion 1.7.1, Git 1.7.8, PHP 5.3.8 among other components. The primary difference between the two versions are the Ruby and Rails versions included:

RubyStack 3.1.3 version ships Ruby 1.9.3-p0 and Rails 3.1.3.

RubyStack 2.3.14 version includes Ruby 1.8.7-p334 and Rails 2.3.14.

We have also released an up-to-date quick start guide in PDF where you can learn how to create your own Ruby On Rails project on top of this BitNami Stack.


Monday, January 16, 2012

Run BitNami Apps on Windows Free on AWS


This morning, Amazon announced that they have added support for Windows to their free tier, which allows users new to AWS to run a micro instance free for one year. As all of the free BitNami AMIs are available for Windows, you can now run all of the apps in the BitNami library on Amazon's free Windows tier. Note that the BitNami Windows AMIs are currently available for Windows Server 2008.r1.sp2. We are working on updating the AMIs to support r2 and should have those available soon.

To get started, select the app you would like to run from the BitNami library and then check out our tutorial for a step-by-step how-to guide. Enjoy!

Wednesday, January 11, 2012

BitNami Liferay 6.1 Stack Now Available

Last Friday, v6.1 of the Liferay open source enterprise portal was released. We're pleased to announce that the BitNami Liferay Stack has been updated to include this new release, which includes the following features (taken from the Liferay website):

  • Updated Support Matrix - Liferay's general policy is to update our support matrix for each release, testing Liferay against newer major releases of supporting operating systems, app servers, browsers, and databases (we reguarly update the bundled upstream open source libraries to fix bugs or take advantage of new features in the open source we depend on).  For example, we are moving to Tomcat 7.x, MySQL 5.5.x, JBoss AS 7, Geronimo 2.2.1, and others.
  • UI Refinements - Too numerous to list here.  Many tasks that used to require a trip to Control Panel (thus losing your UI context) can now be done via the "Manage" menu.  Document Libary has gotten a sweet overhaul.  General improvements in snappiness.  
  • Sites - As described in Jorge's blog and now in the official documentation, the Sites concept has been introduced, decoupling a set of pages from an associated community or organization.  This is one of the big conceptual changes in 6.1.
  • Setup Wizard - To ease the first-time configuration of a portal (and its associated database), when starting a new instance of Liferay, the optional Setup Wizard will prompt for and configure these items for you.  No more mucking about withportal-ext.properties for those basic configurations everyone wants to do initially.
  • Mobile Device Enhancements -  For example,  mobile device rules allow you to configure sets of rules and use those rules to alter the behavior of the portal based on the device being used to access Liferay. You can also access and evaluate rules through custom scripts.
  • Social Activity Improvements - Many improvements to the social value system (formerly known as Social Equity).  Check out the official documentation on what's new
  • Asset Publisher Improvements - The darling of the supplied out-of-box portlets, Asset Publisher can now do things like show and publish content from/to multiple scopes, better linking behavior for assets, and many more.
  • Content Management Goodness - One of Liferay's core strengths is its simple yet powerful Web Content Management System.  There have been many usability and functional improvements to it, including inline drag/drop structure editing, internationalized web content titles, preloading of structures on template creation, selection of default display pages, and more!
  • Search Improvements - Lots of performance and accuracy improvements.  Including users in search results.  
This is just a partial list of new features. For a complete list of improvements, check out Liferay's announcement. Then, download the BitNami Liferay native installer or virtual appliance, or deploy Liferay to the Amazon Cloud (AWS) with the BitNami Liferay AMI. Enjoy!

Please note that there is a known issue in the welcome page where the Liferay application does not display some of the images. We are working with Liferay to correct this and will post an update as soon as it is available, but it should not otherwise affect the application. There is also a known issue with Java on micro instances in the AWS Cloud that causes rebooted instances to hang. This issue is out of our control but has been reported to Amazon.

Get started with CakePHP in the Amazon Cloud

In this post, we will walk you step by step through how to start a project with CakePHP in the Amazon Cloud using a BitNami LAMP Stack AMI. BitNami  LAMPWAMP and MAMP Stacks bundle other framework like ZendFramework, Symfony and CodeIgniter.

First, you will need an Amazon acount and you can find how to create your account here. New Amazon users are eligible for a free tier which provides a free micro instance for a year. Once you log in to the AWS Console, go to the EC2 tab and launch a new Instance. You can locate the BitNami LAMP Stack image by searching in the Community AMIs tab for "lampstack-5.3.8-2", that is the latest version at the time of this writing. I you want to run it using the free tier plan, you should run the 32bit or 64bit EBS AMI.

Launching BitNami LAMPStack from the AWS Console

Another option is to launch directly from the BitNami website. You can select your preferred region (United States, Europe, Asia or South America) and the architecture (32 or 64 bits) and click on the appropriate link.

Then, you can set different parameters from the AWS Console: availability zone, ssh key, the image type (micro, small, medium) and the security group. Once the machine is started, access it by typing the public DNS name in a browser and you should see a welcome page for BitNami LAMPStack.

Now it is time to connect to the machine. You can download the private SSH key from your Amazon account. If you want to connect to the machine from Windows using the popular tool Putty, you will need to convert your private key to the .PPK format. Take a look at this tutorial if you are not sure how to perform this conversion.

On Linux or OS X, you can open a Terminal and run the following command:

$ ssh -i /path/to/your/private/key.pem bitnami@ec2-xx-xx-xx-amazonaws.com

You will see a welcome message similar to:

BitNami welcome message
All the required files for the CakePHP framework are in the "/opt/bitnami" folder:

ctlscript.sh: It is the main script to start and stop the servers.
frameworks/cakephp: The CakePHP framework files.
apache2: The Apache server files.
php: The PHP language files.
mysql: The MySQL database files.

One of the advantages of this structure is that you can install the BitNami LAMP Stack on your own desktop machine, develop your application locally and then migrate the full directory directly to the cloud.

You can edit the files online with a command line editor (nano, vim, emacs) but many people prefer to edit files with a graphical editor locally. Using an SFTP client like FileZilla, you can edit the files from your computer. If you need help, see our how-to for configuration instructions.

Edit the Apache configuration file /opt/bitnami/apache2/conf/httpd.conf and uncomment the following line at the end of the file:

Include "/opt/bitnami/frameworks/cakephp/conf/cakephp.conf"


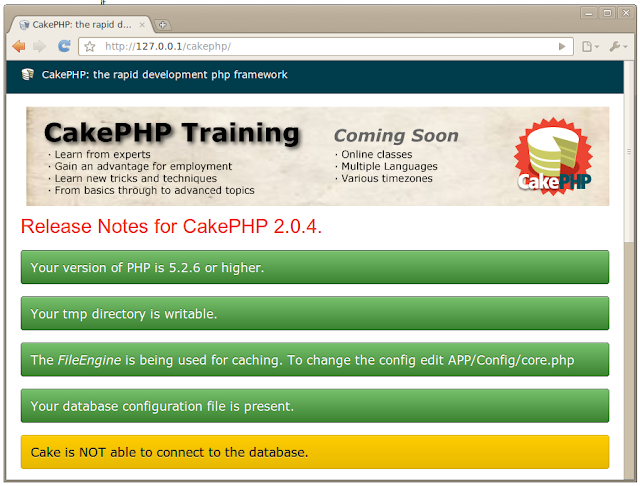
Restart the Apache server and visit the CakePHP welcome page at http://ec2-xx-xx-xx-amazonaws.com/cakephp

$ sudo /opt/bitnami/ctlscript.sh restart apache


CakePHP welcome page


That's all! You can now create your CakePHP application in the Amazon cloud. Notice that you should modify the default encryption keys in the "/opt/bitnami/frameworks/cakephp/app/Config/core.php" file:

Configure::write('Security.salt', '');
Configure::write('Security.cipherSeed', '');


If your applications are going to use a database (and they probably will), you can edit the database settings at "/opt/bitnami/frameworks/cakephp/app/Config/database.php". BitNami LAMP Stack also ships the phpMyAdmin tool that you can use it to manage your MySQL database. If you need help, check our how-to for access instructions.