Showing posts with label Apache. Show all posts

Tuesday, January 21, 2020

Access and Manage Your Servers Remotely with the Bitnami Stack for Apache Guacamole

Want to access your computers from anywhere using just a Web browser? Look no further than Apache Guacamole, a "clientless remote desktop gateway" that supports standard protocols like VNC, SSH, and RDP and requires no plugins or client software.

Apache Guacamole allows users to access their computers from anywhere while also providing administrators with a way to configure, manage and control access to remote desktop connections. You can also combine it with a cloud-hosted desktop operating system to benefit from the flexibility and resilience of cloud computing.

Bitnami has released an up to date and secure image that you can use to launch Apache Guacamole locally or in the cloud. Choose the platform you want to run it on and immediately benefit from having your desktop reachable from any part of the world and from any device.

This blog post shows you how easy it is to deploy the Bitnami Stack for Apache Guacamole on the Microsoft Azure Cloud. It also walks you through the process of creating a remote connection with a Windows machine running on a Microsoft Azure server.
These instructions are for the Microsoft Azure Portal, but you can also run Apache Guacamole on an AWS instance, an Oracle server, and soon on a Google Cloud Platform server. You can also play with it on your local machine by downloading a virtual appliance.

Glyptodon Enterprise also available for Apache Guacamole


For those users and organizations that require enterprise-class scalability and management, Glyptodon Inc. offers a commercial solution powered by Apache Guacamole: Glyptodon Enterprise.

This package includes streamlined installation and maintenance, and timely security updates.
It also offers long-time support for major releases for at least five years and receives regularly scheduled updates. Updates to new releases ensure compatibility, facilitating administrators to keep their installations always up to date.

Glyptodon Enterprise is packaged in RPM repositories and compatible with any Red Hat Enterprise Linux or CentOS release.


Deploy the Bitnami Stack for Apache Guacamole 


Deploying Apache Guacamole from the Bitnami Launchpad for Microsoft Azure is easy; everything is included in the image that Bitnami provides for Apache Guacamole. Thus, the application will run on an Azure server without issues. This image uses the latest version of Apache and it includes SSL auto-configuration with Let's Encrypt certificates.

Let's take a quick look at the Bitnami Stack for Apache Guacamole default configuration.  There are three major components included in the image:

  • Apache Guacamole Server 
  • Apache Guacamole Client 
  • Database

Apache Guacamole Server
It is a daemon server (guacd) that talks to the remote desktops and accepts connections from the users logged in to the Web application.

Apache Guacamole Client
It is the frontend of Guacamole, implemented as a Java application that runs on top of Apache Tomcat.

Database
The user authentication for Apache Guacamole is configured to work with PostgreSQL.

Launch the Apache Guacamole image


To launch Apache Guacamole, follow these steps:

1. In the Apache Guacamole deployment offering page, click the “Single-Tier” button to display the deployment options for the cloud.


2. Select the cloud where you want to deploy the application. This post uses Microsoft Azure, but the deployment process is similar in other clouds.

Make sure that your Microsoft Azure and Bitnami accounts are connected. Check the Get Started with the Bitnami Launchpad for Microsoft Azure guide for more information on this.


You will be redirected to the Bitnami launchpad to create a new virtual machine on Azure.

3. Enter a name for your server, select the server size, and the region where you want to deploy the solution. As you can see in the image below, the image type is selected by default:


4. Confirm your selection by hitting the “Create” button at the end of the page. The Bitnami Launchpad will now begin spinning up the new server. The process usually takes a few minutes, and a status indicator on the page provides a progress update.

Access the client


Once the cloud server has been provisioned, the status indicator will show that it is “running”, and the Bitnami Launchpad page will display the server details, application credentials, IP address, and the SSH keys and command for connecting to the server remotely.

You can manage your application from the Bitnami Launchpad user interface or by accessing the Azure Console through the “Manage in the Azure Console” button.

To access the Apache Guacamole Client:

1. Click the “Go to the application” button.


2. Log in to the client by using the credentials provided in the “Application Info” section.

Use Apache Guacamole


To start managing users and connections, navigate to the user profile and select the “Settings” option from the drop-down menu.

Create a new connection


To enable a new remote connection, follow these instructions:

1. Navigate to the “Settings -> Connections” tab.  Click the “New Connection” button.


2. In the resulting form, enter a name to identify the connection, location, and protocol.

3. Select “ROOT” as location. Then select the protocol you want to use to connect to the machine.

In general, the protocol used for connecting with a Windows machine is RDP. In case you want to connect to a Linux server, then use the VNC protocol.

4. Fill the rest of the required values such as the connection limit, load balancing details, or the Guacamole proxy parameters.

5. In the “PARAMETERS -> Network” section, enter the public IP address of your machine in the “Hostname” field and the port. In the “Authentication” section, enter the username and password associated with your machine.


NOTE: Make sure that the server where the Windows machine is running. It should be publicly accessible to ensure that Apache Guacamole is able to connect remotely to it.

6. Click “Save” to create this new connection.

Create a user 


Once the connection is created, you need to create a user and associate the connection with it. 
1. Navigate to the “Settings -> Users” tab. You will see the admin user in the list of enabled users. To add a new user, click the “New users” button.

2. In the resulting form, enter the username, password, and personal info. Define the account restrictions and permissions and click “Save” to make the changes take effect.

3. In the “CONNECTIONS” section, you will find the connection you have created. Activate the checkbox to associate the user with that connection. Click “Save” to make the changes take effect.


Connect remotely to your machine


To start using the new connection, back to the “Home” page and click the RDP connection.
Apache Guacamole will connect you directly to your machine:


Learn more about how to use the Bitnami Stack for Apache Guacamole in the Bitnami documentation page or the Apache Guacamole official manual. Remember that if you need enterprise-class scalability and management, Glyptodon Enterprise is the best choice for you. Start working remotely!

Tuesday, April 9, 2019

Bitnami Apache Airflow Multi-Tier Now Available in Azure Marketplace

Originally published on the Azure blog on April 9th, 2019.

A few months ago, we released a blog post that provided guidance on how to deploy Apache Airflow on Azure. The template provided a good quick start solution for anyone looking to quickly run and deploy Apache Airflow on Azure in sequential executor mode for testing and proof of concept study. However, the template was not designed for enterprise production deployments and required expert knowledge of Azure app services and container deployments to run it in Celery Executor mode. This is where we partnered with Bitnami to help simplify production grade deployments of Airflow on Azure for customers.

We are excited to announce that the Bitnami Apache Airflow Multi-Tier solution and the Apache Airflow Container are now available for customers in the Azure Marketplace. To see how easy it is to launch and start using them, check out the quick video tutorial below:


We are proud to say that the main committers to the Apache Airflow project have also tested this application to ensure that it was performed to the standards that they would expect.

Apache Airflow PMC Member and Core Committer Kaxil Naik said, “I am excited to see that Bitnami provided a Airflow Multi-Tier in the Azure Marketplace. Bitnami has removed the complexity of deploying the application for data scientists and data engineers, so they can focus on building the actual workflows or DAGs instead. Now, data scientists can create a cluster for themselves within about 20 minutes. They no longer need to wait for DevOps or a data engineer to provision one for them.”

What is Apache Airflow?

Apache Airflow is a popular open source workflow management tool used in orchestrating ETL pipelines, machine learning workflows, and many other creative use cases. It provides a scalable, distributed architecture that makes it simple to author, track and monitor workflows.

Users of Airflow create Directed Acyclic Graph (DAG) files to define the processes and tasks that must be executed, in what order, and their relationships and dependencies. DAG files are synchronized across nodes and the user will then leverage the UI or automation to schedule, execute and monitor their workflow.

Introduction to Apache Airflow Architecture

Bitnami Apache Airflow has a multi-tier distributed architecture that uses Celery Executor, which is recommended by Apache Airflow for production environments.

It is comprised of several synchronized nodes:

● Web server (UI)
● Scheduler
● Workers

It includes two managed Azure services:

● Azure Database for PostgreSQL
● Azure Cache for Redis

All nodes have a shared volume to synchronize DAG files.

DAG files are stored in a directory of the node. This directory is an external volume mounted in the same location in all nodes (both workers, scheduler, and web server). Since it is a shared volume, the files are automatically synchronized between servers. Add, modify or delete DAG files from this shared volume and the entire Airflow system will be updated.

You can also use DAGs from a GitHub repository. By using Git, you won’t have to access any of the Airflow nodes and you can just push the changes through the Git repository instead.

To automatically synchronize DAG files with Airflow, please refer to Bitnami’s documentation.

Bitnami’s Secret Sauce - Packaging for Production Use

Bitnami specializes in packaging multi-tier applications to work right out of the box leveraging the managed Azure services like Azure Database for PostgreSQL.

When packaging the Apache Airflow Multi-Tier solution, Bitnami added a few optimizations to ensure that it would work for production needs.

● Pre-packaged to leverage the most popular deployment strategies. For example, using PostgreSQL as the relational metadata store and the Celery executor.
● Role-based access control is enabled by default to secure access to the UI.
● The cache and the metadata store are Azure-native PaaS services that leverage the additional benefits those services offer, such as data redundancy and retention/recovery options as well as allowing Airflow to scale out to large jobs.
● All communication between Airflow nodes and the PostgreSQL database service is secured using SSL.

To learn more, join Azure, Apache Airflow, and Bitnami for a webinar on Wednesday, May 1st at 11:00 am PST - Register Now.

Get Started with Apache Airflow Multi-Tier Certified by Bitnami Today!

Wednesday, July 20, 2016

Security notification: httpoxy A CGI application vulnerability (CVE-2016-5385, CVE-2016-5387, CVE-2016-1000110)


On July 18th, a vulnerability named ‘HTTPoxy’ was announced, affecting some server-side web applications that run in CGI or CGI-like environments, such as some FastCGI configurations.

A number of CVEs have been assigned, covering specific languages and CGI implementations:
  • CVE-2016-5385: PHP
  • CVE-2016-5386: Go
  • CVE-2016-5387: Apache HTTP Server
  • CVE-2016-5388: Apache Tomcat
  • CVE-2016-1000109: HHVM
  • CVE-2016-1000110: Python
More information about the vulnerability can be found on the httpoxy website.

Any PHP-based, Python-based or Tomcat-based Bitnami application is affected by this security issue.

We believe it is of the utmost importance to quickly address any security issues in applications distributed by Bitnami and our team is working to update all of the affected Cloud Images, Virtual Machines and Native Installers available through Bitnami.

Please take a moment to check if your image is vulnerable by following the instructions in the security section of our wiki.

You can mitigate the issue by blocking the Proxy request headers as early as possible, and before they hit your application. This is easy and safe.

Apache


  • Modify the <IfModule headers_module> in the /opt/bitnami/apache2/conf/httpd.conf file of Apache to unset the Proxy header. It will look like this:
...
<IfModule headers_module>
    RequestHeader unset Proxy
    ...
</IfModule>
... 

  •  Save the file and restart the service of Apache
sudo /opt/bitnami/ctlscript.sh restart apache 

Nginx


  • Add this line at the end of the file at /opt/bitnami/nginx/conf/fastcgi_params.
fastcgi_param  HTTP_PROXY "";

  • Save the file and restart the service of Nginx
sudo /opt/bitnami/ctlscript.sh restart nginx 


If you have any questions about this process, please post to our community support forum and we will be happy to help!

Update: 2016-07-22


The Bitnami Team has been working on releasing all the affected stacks in the different cloud vendors and we have to announce that the images of Google, Azure, 1&1 and GoDaddy have been updated properly. 

We continue working on releasing pending cloud platforms, virtual machines and the native installers. 

Update: 2016-07-26


All the cloud images, virtual machines and native installers that were affected by this security issue have been successfully patched and they are already available through Bitnami and our cloud partners. 

If you are using a Bitnami Cloud Hosting instance, you can easily patch it following the guide above while we upgrade the base image. 

Update: 2016-07-29


We patched the base images of Bitnami Cloud Hosting successfully and you can now launch a non-affected instance using Bitnami. You can also check the bundled components of the new images using this link


Tuesday, June 23, 2015

Bitnami Container Images for Docker - Now in Beta

We’re very happy to announce availability of the first set of Bitnami container images focused on the needs of application developers. We’ve been using containers internally for close to a year and have found them useful, both for local and cloud-based development and testing.

Bitnami container images can help you:
  • Reduce the time it takes to setup a developer on a new project
  • Reduce friction when sharing environments - experience less “but it worked on my machine?” 
  • Mix and match languages for specific projects - with consistency, regardless of the components you select
As with any rapidly evolving technology, we’ve run into a few bumps along the way, but believe that containers offer an interesting way to collaborate on your next software project and that they are complementary to our existing installers, virtual machines, and cloud images.

We’re starting small and initially focused on the needs of Web developers. Today we’re announcing beta Bitnami container images for nginx, php-fpm, mariadb, memcached, node, redis, apache, and ruby.

Our container images have been built around some key ideas we wanted, but found lacking, in other publicly available container images. Bitnami containers for Docker:
  • Share a common base OS (initially Ubuntu 14.04) to minimize time-to-get-started
  • Are kept up-to-date with consistent version tagging
  • Are easy to combine into a multi-tier application because they are consistently documented and take a standardized approach to configuration, bootstrapping, and logging
  • Separate data from code to enable upgrading of individual components
  • Include run-time notification of new versions
Bitnami container images are available now on the Docker Hub Registry and on GitHub. A walk-through of  how to use these container images to package a real-world application is also available.

We’re very interested in feedback from you on how these container images could be improved. Please open issues with ideas for enhancements or use cases on GitHub. We welcome contributions to the code, so please open a pull request if you have code to share.

Click here to get Bitnami container images for Docker.

Monday, June 16, 2014

Performance enhacements for Apache and PHP

In addition to updating and expanding the Bitnami Library, we are continuously looking for ways to improve our existing Bitnami stacks. In this latest round of updates, we focused on improving the performance of our Bitnami Stacks in limited resource systems such as Amazon EC2 micro instances, which have 1 virtual CPU and 613 MB of RAM, and Microsoft Azure extra-small virtual machines, that ship 1 CPU core and 768 MB of RAM.

We have now configured our Virtual Machines and Cloud Images to use the Apache Event MPM and PHP-FPM, resulting in reduced memory usage and an increase in the number of simultaneous requests that they can handle.


What is the Apache event MPM?

Apache supports three different Multi-Processing Modules (MPMs) that are responsible for binding to network ports on the machine, accepting requests and dispatching children to handle the requests.

- Prefork: Each child process handles one connection at a time. This is the default mode for Apache.
- Worker: Uses multiple child processes with many threads each.
- Event: This mode was designed to allow more requests to be served simultaneously by passing off some processing work to supporting threads and freeing up the main thread.


What is PHP-FPM?

PHP-FPM (FastCGI Process Manager) is an alternative PHP FastCGI implementation with some additional features useful for heavy-loaded sites. It has been bundled with PHP since version 5.3.3. PHP-FPM has the ability to start workers with different environments and to manage these processes.


Why are event MPM and PHP-FPM recommended for production?

The default configuration for Apache and PHP in Linux systems is to use the prefork MPM with an embedded PHP interpreter. This is a very robust configuration but it means that Apache needs to spawn a separate process for every simultaneous request it wants to serve. Because every child process loads a PHP interpreter and associated libraries, this configuration takes a significant amount of memory. In addition to this, a whole process is tied up when waiting for requests when browsers open a persistent connection to the server (which is particularly common with AJAX-heavy web applications.)

On high traffic websites, an alternate MPM (the event MPM) is preferable because it has the ability to serve a large amount of requests while maintaining low memory usage. It does so by using threads to serve requests. It retains some of the stability of a process-based server by keeping multiple processes available, each with many threads so a thread potentially misbehaving would only affect all the other threads in the same process.

Additionally, the event MPM uses a dedicated thread to deal with the kept-alive connections, and hands requests down to child threads only when a request has actually been made. That allows those threads to free back up immediately after the request is completed.

Because PHP is not thread-safe on Unix environments (in particular many of its most popular extensions), it is not possible to embed an interpreter in each event MPM process. It needs to live as a separate PHP-FPM process. Apache will serve all static resources (images, CSS, etc.) directly while PHP-FPM serves the PHP-related requests.

In the examples below, we provide some benchmarks. We used two different Amazon EC2 instances (micro and small) to run our tests. Both instances had the same WordPress installation and the same memory settings. We used the Siege tool, an HTTP load testing and benchmarking utility. We also used the webpagetest.org tool, which allows you to run speed tests from multiple locations using real browsers.

The test below uses the Siege tool to do a request to the WordPress web page and all the static files. We used 30 concurrent users for 1 minute and we got the following results:


Small EC2 instance with MPM prefork and "mod_php"
Used memory (Apache):        525MB
Transactions:        1606 hits
Availability:       89.92 %
Elapsed time:       59.08 secs
Data transferred:       12.49 MB
Response time:        0.89 secs
Transaction rate:       27.18 trans/sec
Throughput:        0.21 MB/sec
Concurrency:       24.28
Successful transactions:        1411
Failed transactions:         180
Longest transaction:        5.89
Shortest transaction:        0.11
Small EC2 instance with event MPM and PHP-FPM
Used memory (Apache+PHP-FPM):  278MB (max)
Transactions:        2480 hits
Availability:       91.75 %
Elapsed time:       59.10 secs
Data transferred:       21.30 MB
Response time:        0.69 secs
Transaction rate:       41.96 trans/sec
Throughput:        0.36 MB/sec
Concurrency:       29.11
Successful transactions:        2480
Failed transactions:         223
Longest transaction:        6.17
Shortest transaction:        0.11


The main differences when using PHP-FPM with the event MPM are the following:

- The used memory is much lower.
- The amount of data transferred is much higher.
- The transaction rate is higher and there are less failed transactions.

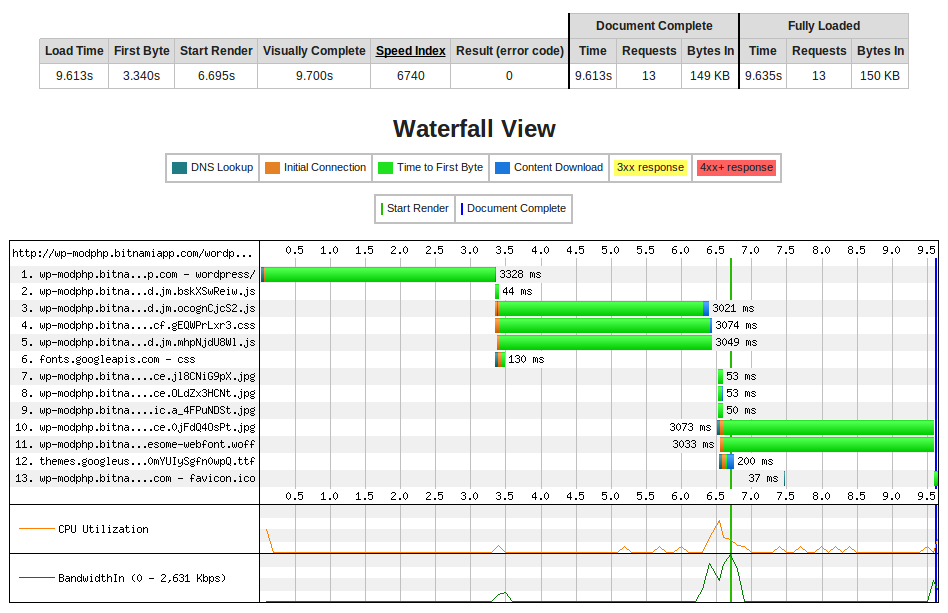
The next test shows the connection and page serving times for running 9 concurrent users using EC2 micro instances with the same WordPress sample site.

1. Apache MPM prefork with "mod_php"


2. Apache event MPM with PHP-FPM


The main differences are the following:

- The load time is much lower in the second case. Note that the load time in the first case could be very different for different tests depending on the number of free child processes.
- The "time to first byte" for the requests is much lower in the second case.


In conclusion, the Apache event MPM increases the performance of Apache, allowing it to serve more requests with less memory. If you want to deploy a PHP application you should use PHP-FPM to handle PHP requests. This is highly recommend for running applications in servers with limited memory, such as like cloud instances with 512MB or 1Gb RAM. You can find more info about these tests on our Wiki and feel free to ask any questions in our community forum.

Want to try deploying a Bitnami application in the cloud? Select your favorite application at https://bitnami.com/stacks and launch it in minutes with just a few mouse clicks.

Monday, November 12, 2012

New BitNami PHP 5.4 xAMP stacks

We are happy to announce that all of the BitNami PHP-based development stacks have been updated to include PHP 5.4, Apache 2.4 and PostgreSQL 9.2 support. 

You can download LAMP stack for Linux, MAMP stack for OS X and WAMP stack for Windows to develop PHP-based applications on your Desktop, using your favorite Operating System. There are also virtual machines available for download and cloud images to deploy them on Amazon EC2 directly. They ship the following main components:
  • PHP 5.4.8
  • Apache 2.4.3
  • MySQL 5.5.21
  • phpMyAdmin 3.5.3
  • Optional frameworks:
    • ZendFramework 2.0.3
    • CodeIgniter 2.1.3
    • Symfony 2.1.3
    • CakePHP 2.2.3
    • Smarty 3.1.12
    • Laravel 3.2.11


We have also upgraded the PostgreSQL based stacks to the the latest stable version, PostgreSQL 9.2.0. Because the LAPP, MAPP and WAPP stacks are available as native installers, virtual machine images and AMIs, you can develop on a local machine natively or in a virtual environment and then deploy the application to Amazon EC2 for testing and production.

BitNami has a popular module-based system. You can easily install additional BitNami applications on top of the LAMP, MAMP and WAMP stacks. Check our documentation to know how to add WordPress, Joomla!, Drupal, SugarCRM and other popular apps on top of these stacks.

BitNami PHP-based modules for LAMP, MAMP and WAMP stacks

Friday, November 9, 2012

Try out LimeSurvey 2.0 with BitNami


After a long wait, LimeSurvey 2.0 was finally released a few weeks ago. LimeSurvey is a popular and feature-rich open source online survey tool.  You can learn more about LimeSurvey at the LimeSurvey website. We are glad to announce that this latest version is  available on BitNami and ready for you to give it a try.

LimeSurvey allows users to quickly create intuitive, powerful, online question-and-answer surveys that can work for tens to thousands of participants without much effort. The survey software itself is self-guiding for the respondents who are participating.

The BitNami packages for LimeSurvey provide all-in-one free native installers, virtual machines and Amazon Cloud Images that simplify LimeSurvey installation and hosting. The stacks include a pre-configured version of LimeSurvey and all of its required dependencies. This version of the LimeSurvey stacks for BitNami also includes major upgrades to base components such as Apache 2.4 and PHP 5.4.8. Give LimeSurvey a try now!

Tuesday, September 11, 2012

Updated BitNami AMP Stacks for PHP development

We have just released updated versions of all of the BitNami AMP Stacks, which include a number of major updates and additions. If you are not familiar with the term, "AMP" stands for Apache-MySQL-PHP. The name of each BitNami AMP Stack depends on the operating system; there is WAMP for Windows, MAMP for OS X and LAMP for Linux.

We also release "APP" versions of these stacks, which include the PostgreSQL database instead of MySQL. As with the AMP Stacks, the APP Stacks are named differently for each operating system: WAPP for Windows, MAPP for OS X and LAPP for Linux.

All of the above BitNami Stacks have been updated to include the latest stable releases of their major components, which are listed below. We also offer development versions of the stacks which bundle beta or brand-new releases of the components. They are great for trying out the latest and greatest new releases in a contained environment.
  • Apache 2.2.22  (or 2.4.3 in the development version)
  • PHP 5.3.16  (or 5.4.6 in the development version)
  • MySQL 5.5.21
  • phpMyAdmin 3.5.2.2
  • PostgreSQL 9.1.3 (optional)
  • phpPgAdmin 5.0.4 (optional)
In addition to the above, the stacks bundle the following PHP frameworks for development:
  • ZendFramework 1.12.0
  • Symfony 2.0.17
  • CakePHP 2.2.1
  • CodeIgniter 2.1.2
  • Smarty 3.1.11
Smarty is a new addition to the stacks with this latest release. It is a template engine for PHP, facilitating the separation of presentation (HTML/CSS) from application logic. This implies that PHP code is application logic, and is separated from the presentation.

Check our new Quick Start Guide to know how to start with BitNami AMP/APP Stacks.

Welcome page
Applications page

As usual, the BitNami AMP Stacks are available in the form of ready-to-run installers, virtual machine images (VMs) and Amazon Machine Images (AMIs) for the Amazon Cloud. You can also get simplified deployment and management of AMP / APP development environments in the cloud with BitNami Cloud Hosting. Sign up for our free developer plan to check it out!